> ## Documentation Index
> Fetch the complete documentation index at: https://developers.pleo.io/llms.txt
> Use this file to discover all available pages before exploring further.
# How to Perform Pre-Export Validation
export const WhatComesNext = ({children, href}) => ;
export const PreExportValidationDiagram = () => {
const diagram = `
%%{init: {"themeVariables": {"fontSize": "16px"}}}%%
flowchart LR
S1["1. Validate AS Connectivity"] --> S2["2. Validate Company Context"] --> S3["3. Validate Bookkeeping Capability"]
S3 -->|passes| S5["Validation Passed"]
S1 -->|fails| S4["4. Fail Early"]
S2 -->|fails| S4
S3 -->|fails| S4
click S1 "#1-validate-accounting-system-connectivity"
click S2 "#2-validate-company-context"
click S3 "#3-validate-bookkeeping-capability"
click S4 "#4-fail-early-if-validation-fails"
style S1 white-space:normal
style S2 white-space:normal
style S3 white-space:normal
style S4 white-space:normal
style S5 white-space:normal
`;
return ;
};
export const WorkflowDiagramTopNav = ({highlight}) => {
const highlightStyle = highlight ? `style ${highlight} stroke:#f63b92,stroke-width:5px` : "";
const diagram = `
%%{init: {"themeVariables": {"fontSize": "28px"}}}%%
flowchart LR
WEBAPP["Queue Export Items in Pleo's Web App"]
subgraph Pleo["Pleo API's"]
START1[" "]
A["1.Detect & Start Export Jobs"] --> B["2.Perform Pre-Export Validation"]
B --> C["3.Retrieve Export Job Items for Processing"]
C --> D["4.Fetch Export Item Data for Processing"]
end
subgraph ERP["AS/ERP"]
START2[" "]
E["5.Process & Record Export Items"]
end
subgraph Pleo2["Pleo API's"]
START3[" "]
F["6.Update Export Items"] --> G["7.Update & Complete Export Job"]
end
WEBAPP --> A
D --> E
E --> F
click WEBAPP "/docs/current/how-tos/accounting-integrations/how-to-queue-export-items-in-ui"
click A "/docs/current/how-tos/accounting-integrations/how-to-detect-and-start-export-jobs-for-as-erp-processing"
click B "/docs/current/how-tos/accounting-integrations/how-to-perform-pre-export-validation-for-as-erp-processing"
click C "/docs/current/how-tos/accounting-integrations/how-to-retrieve-export-job-items-for-as-erp-processing"
click D "/docs/current/how-tos/accounting-integrations/how-to-fetch-export-item-data-for-as-erp-processing"
click E "/docs/current/how-tos/accounting-integrations/how-to-determine-the-bookkeeping-method-for-as-erp-processing"
click F "/docs/current/how-tos/accounting-integrations/how-to-update-export-items-for-as-erp-processing"
click G "/docs/current/how-tos/accounting-integrations/how-to-update-and-complete-export-job-for-as-erp-processing"
style WEBAPP white-space:normal
style Pleo white-space:normal
style ERP white-space:normal
style Pleo2 white-space:normal
style A white-space:normal
style B white-space:normal
style C white-space:normal
style D white-space:normal
style E white-space:normal
style F white-space:normal
style G white-space:normal
style START1 fill:transparent,stroke:transparent,color:transparent
style START2 fill:transparent,stroke:transparent,color:transparent
style START3 fill:transparent,stroke:transparent,color:transparent
style Pleo fill:none,stroke:#000000
style ERP fill:none,stroke:#000000
style Pleo2 fill:none,stroke:#000000
${highlightStyle}
`;
return ;
};
export const NoteCallout = ({title, children, icon = "💡"}) =>
{icon}
{title &&
{title}
}
{children}
;
export const RememberCallout = ({title, children, icon = "🪢"}) =>
{icon}
{title &&
{title}
}
{children}
;
This how-to explains how an integration validates readiness before processing Export Items.
Pre-export validation ensures that the Accounting System and integration configuration are ready before any data is transferred.
This step occurs after an Export Job has been started and before any Export Items are fetched or processed.
At this stage, the Export Job is in progress and no accounting entries have been created, so failures can safely stop the workflow.
Your integration must verify:
* The Accounting System is available
* The correct company context is selected for multi-entity scenarios
* The correct Integration Configuration exists
## Prerequisites
Before you begin:
* You're familiar with the [Export Lifecycle](/docs/current/platform/exports/lifecycle) and the [Integration Design for Pre-Export Validation](/docs/current/integration-design/exports/integration-design-exports-pre-export-validation)
* An Export Job has been successfully [Detected and Started](/docs/current/how-tos/accounting-integrations/how-to-detect-and-start-export-jobs-for-as-erp-processing) for processing
* You can call both Pleo APIs and the target Accounting System APIs
## Steps
### 1. Validate Accounting System Connectivity
Ensure the Accounting System is reachable and ready to accept data.
Confirm:
* API authentication is valid
* required permissions are available
* key operations are supported
Typical checks include:
* ability to create journal entries
* support for vendor bookkeeping (if applicable)
* support for attachments
**Example Pseudo:**
```pseudo theme={null}
if not canAuthenticate():
failExportJob(job.id, "accounting_system_unreachable")
if not hasRequiredPermissions():
failExportJob(job.id, "invalid_configuration")
```
***
### 2. Validate Company Context
**API Endpoint**: GET [/v3/export-jobs](/reference/export-api/export-api-v3/get-a-list-of-export-jobs)
**Example parameters:** companyId: `12abc3d4-e567-890e-1234-abc56e78fabc`
Use Export Job metadata to ensure the correct company context is selected. This is important in [multi-entity](/docs/current/platform/multi-entity/multi-entity-and-api-scope) setups.
```json theme={null}
{
"companyId": "12abc3d4-e567-890e-1234-abc56e78fabc"
}
```
**Example Pseudo:**
```pseudo theme={null}
if not companyExists(job.companyId):
failExportJob(job.id, "invalid_configuration")
```
### 3. Validate Bookkeeping Capability
**API Endpoint**: GET [/v3/export-jobs](/reference/export-api/export-api-v3/get-a-list-of-export-jobs)
Export Jobs may require specific bookkeeping workflows.
For example:
```json theme={null}
{
"vendorBasedBookkeeping": true
}
```
If vendor-based bookkeeping is required, your integration must support it.
**Example Pseudo:**
```pseudo theme={null}
if job.vendorBasedBookkeeping and not supportsVendorMode():
failExportJob("invalid_configuration")
```
Vendor-based bookkeeping (AP-style) means expenses/invoices can be exported against a specific vendor/supplier (vendor ledger) rather than as generic journal entries; when enabled via `vendorBasedBookkeeping`, integrators must be able to create the correct record type based on each item’s [`bookkeeping.method`](/docs/current/how-tos/accounting-integrations/how-to-determine-the-bookkeeping-method-for-as-erp-processing).
### 4. Fail Early if Validation Fails
**API Endpoint**: POST [/v3/export-job-events](/reference/export-api/export-api-v3/create-an-export-job-event)
**Example parameters:** jobId: `8eb648ab-464b-42a0-ba17-eda703657e33`
If any validation step fails, the Export Job must be explicitly marked as failed.
Failing early ensures:
* no Export Items are processed
* the system remains consistent
* users receive clear feedback in Pleo's Web App
**Example Pseudo:**
```pseudo theme={null}
if validationFails:
failExportJob(job.id, reason)
stop processing
```
#### Example Request
```bash theme={null}
curl -X POST "https://external.staging.pleo.io/v3/export-job-events" \
-H "Authorization: Bearer " \
-H "Content-Type: application/json" \
-d '{
"event": "failed",
"jobId": "8eb648ab-464b-42a0-ba17-eda703657e33",
"failureReason": "vendorBasedBookkeeping not supported by this integration",
"failureReasonType": "invalid_configuration"
}'
```
```bash theme={null}
curl --request POST \
-u "pls_1ab2cd3e4f5g6h7a89b012c34de56f78_gabc90:" \
-H "Accept: application/json;charset=UTF-8" \
-H "Content-Type: application/json" \
"https://external.staging.pleo.io/v3/export-job-events" \
-d '{
"event": "failed",
"jobId": "8eb648ab-464b-42a0-ba17-eda703657e33",
"failureReason": "vendorBasedBookkeeping not supported by this integration",
"failureReasonType": "invalid_configuration"
}'
```
#### Example Response
**API Endpoint**: GET [`/v3/export-jobs/{jobId}`](/reference/export-api/export-api-v3/get-an-export-job)
If the request succeeds, re-running the `/v3/export-jobs/{jobId}` command will return an updated status of `failed`.
```json theme={null}
{
"status": "failed",
"failureReasonType": "invalid_configuration",
"failureReason": "vendorBasedBookkeeping not supported by this integration",
}
```
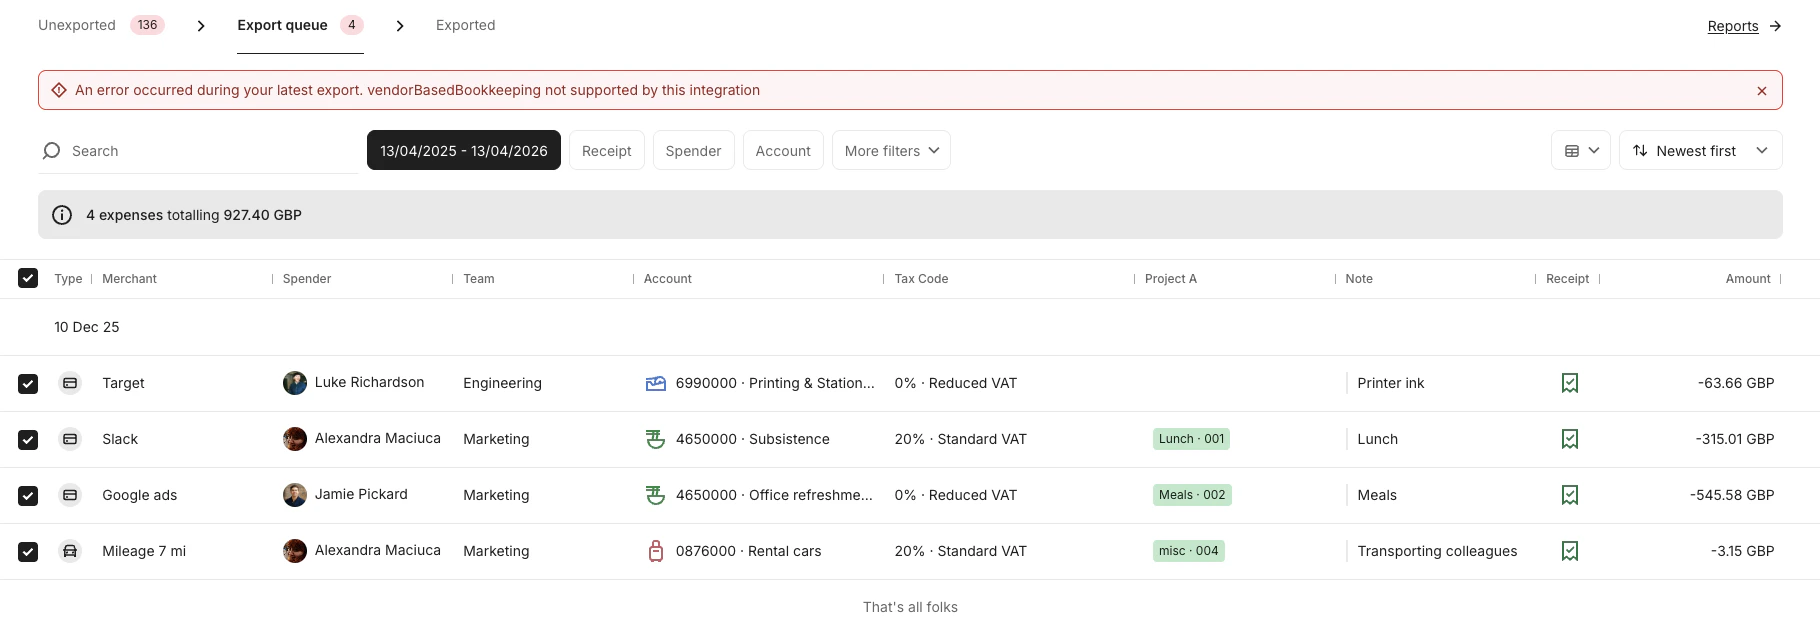
#### Pleo Web App
The failed export status is updated in the Pleo Web App. Once any issues have been resolved, rerun the export job by clicking **Export** at the bottom of the screen.
Each time you click **Export**, a new job is created in the export queue with a unique `jobId`.
#### Common Failure Reasons
Use clear and actionable failure reasons:
* `invalid_configuration` — unsupported workflows
* `missing_configuration` — missing mappings or setup
* `accounting_system_unreachable` — connectivity or API issues
Failure reason types should align with the [Export API specification](/reference/export-api/export-api-v3/create-an-export-job-event#body-failure-reason-type).
Fail the Export Job only when the issue prevents **all items** from being processed.
Item-level issues should be handled later during Export Item processing.
## Result
After completing these steps:
* The integration has verified readiness for export processing
* Invalid or unsupported scenarios are safely rejected
* Only valid Export Jobs proceed to item processing
***
## What Comes Next?
Fetch Export Items and begin processing individual expenses
***
this how-to is part of:
***
## Related Reading
* [Export Lifecycle](/docs/current/platform/exports/lifecycle)
* [Connection and Authorisation Overview](/docs/current/integration-design/auth/integration-design-auth-overview)
***