> ## Documentation Index
> Fetch the complete documentation index at: https://developers.pleo.io/llms.txt
> Use this file to discover all available pages before exploring further.

# How to Activate a Vendor in Pleo

> For Vendor Creation, how to report the AS-assigned identifiers back to Pleo to activate a Vendor created from a DRAFT.

export const ActivateVendorInPleoDiagram = () => {
  const [isDark, setIsDark] = useState(false);
  useEffect(() => {
    const check = () => setIsDark(document.documentElement.classList.contains("dark"));
    check();
    const observer = new MutationObserver(check);
    observer.observe(document.documentElement, {
      attributes: true,
      attributeFilter: ["class"]
    });
    return () => observer.disconnect();
  }, []);
  const nodeFill = isDark ? "#212222" : "#EEF4F4";
  const nodeStroke = isDark ? "#848989" : "#E1E6E6";
  const nodeTextStyle = isDark ? ",color:#EEF4F4" : ",color:#131414";
  const s2Fill = isDark ? "#212222" : "#EEF4F4";
  const s2Stroke = isDark ? "#848989" : "#212222";
  const s2TextStyle = isDark ? ",color:#EEF4F4" : ",color:#212222";
  const linkStyle = isDark ? "" : "linkStyle default stroke:#848989,stroke-width:1px;";
  const diagram = `
%%{init: {"themeVariables": {"fontSize": "10px"}}}%%
flowchart LR
    S1["1. Activate Vendor in Pleo<br>(code + externalId)"] --> S2["Vendor state: ACTIVE"]

click S1 "#1-activate-the-vendor-in-pleo"

style S1 white-space:normal,fill:${nodeFill},stroke:${nodeStroke}${nodeTextStyle}
style S2 white-space:normal,fill:${s2Fill},stroke:${s2Stroke},stroke-dasharray:5 5${s2TextStyle}
${linkStyle}
`;
  return <Mermaid chart={diagram} />;
};

export const VendorCreationWorkflowDiagramTopNav = ({highlight}) => {
  const [isDark, setIsDark] = useState(false);
  useEffect(() => {
    const check = () => setIsDark(document.documentElement.classList.contains("dark"));
    check();
    const observer = new MutationObserver(check);
    observer.observe(document.documentElement, {
      attributes: true,
      attributeFilter: ["class"]
    });
    return () => observer.disconnect();
  }, []);
  const nodeFill = isDark ? "#212222" : "#EEF4F4";
  const nodeStroke = isDark ? "#848989" : "#E1E6E6";
  const nodeTextStyle = isDark ? ",color:#EEF4F4" : ",color:#131414";
  const subgraphFill = isDark ? "#131414" : "#ffffff";
  const subgraphStroke = isDark ? "#848989" : "#6B7070";
  const subgraphTextStyle = isDark ? ",color:#EEF4F4" : ",color:#6B7070";
  const linkStyle = isDark ? "" : "linkStyle default stroke:#848989,stroke-width:1px;";
  const highlightStyle = highlight ? `style ${highlight} stroke:#FEB6FE,stroke-width:2px` : "";
  const diagram = `
%%{init: {"themeVariables": {"fontSize": "16px"}}}%%
flowchart LR

subgraph Pleo1["Pleo"]
    A["1. Create Vendor in Pleo"]
end

subgraph Integration["Integration"]
    B["2. Detect Draft<br>Vendor<br>"]
    C["3. Create Vendor<br>in AS<br>"]
    B --> C
end

subgraph Pleo2["Pleo"]
    D["4. Activate Vendor in Pleo"]
end

A --> B
C --> D

click A "/docs/current/how-tos/accounting-integrations/vendors/how-to-create-vendors-in-pleo"
click B "/docs/current/how-tos/accounting-integrations/vendors/how-to-detect-draft-vendors"
click C "/docs/current/how-tos/accounting-integrations/vendors/how-to-create-vendor-in-as"
click D "/docs/current/how-tos/accounting-integrations/vendors/how-to-activate-vendor-in-pleo"

style A white-space:normal,fill:${nodeFill},stroke:${nodeStroke}${nodeTextStyle}
style B white-space:normal,fill:${nodeFill},stroke:${nodeStroke}${nodeTextStyle}
style C white-space:normal,fill:${nodeFill},stroke:${nodeStroke}${nodeTextStyle}
style D white-space:normal,fill:${nodeFill},stroke:${nodeStroke}${nodeTextStyle}

style Pleo1 fill:${subgraphFill},stroke:${subgraphStroke}${subgraphTextStyle}
style Integration fill:${subgraphFill},stroke:${subgraphStroke}${subgraphTextStyle}
style Pleo2 fill:${subgraphFill},stroke:${subgraphStroke}${subgraphTextStyle}

${highlightStyle}
${linkStyle}
`;
  return <Mermaid chart={diagram} />;
};

export const WhatComesNext = ({children, href}) => <div className="mt-4">
    <a href={href} className="btn-primary">
      {children} →
    </a>
  </div>;

export const WarningCallout = ({title, children}) => <div className="callout-box callout-warning">
    <div className="callout-row">
      <span className="callout-badge">
        <svg width="18" height="18" xmlns="http://www.w3.org/2000/svg" viewBox="0 0 256 256" fill="currentColor"><path d="M215.46,216H40.54C27.92,216,20,202.79,26.13,192.09L113.59,40.22c6.3-11,22.52-11,28.82,0l87.46,151.87C236,202.79,228.08,216,215.46,216Z" opacity="0.2" /><path d="M236.8,188.09,149.35,36.22h0a24.76,24.76,0,0,0-42.7,0L19.2,188.09a23.51,23.51,0,0,0,0,23.72A24.35,24.35,0,0,0,40.55,224h174.9a24.35,24.35,0,0,0,21.33-12.19A23.51,23.51,0,0,0,236.8,188.09ZM222.93,203.8a8.5,8.5,0,0,1-7.48,4.2H40.55a8.5,8.5,0,0,1-7.48-4.2,7.59,7.59,0,0,1,0-7.72L120.52,44.21a8.75,8.75,0,0,1,15,0l87.45,151.87A7.59,7.59,0,0,1,222.93,203.8ZM120,144V104a8,8,0,0,1,16,0v40a8,8,0,0,1-16,0Zm20,36a12,12,0,1,1-12-12A12,12,0,0,1,140,180Z" /></svg>
      </span>
      <div>
        {title && <div className="callout-title">
            {title}
          </div>}
        <div className="callout-body">
          {children}
        </div>
      </div>
    </div>
  </div>;

export const NoteCallout = ({title, children}) => <div className="callout-box callout-note">
    <div className="callout-row">
      <span className="callout-icon">
        <svg width="22" height="22" xmlns="http://www.w3.org/2000/svg" viewBox="0 0 256 256" fill="currentColor"><path d="M208,104a79.86,79.86,0,0,1-30.59,62.92A24.29,24.29,0,0,0,168,186v6a8,8,0,0,1-8,8H96a8,8,0,0,1-8-8v-6a24.11,24.11,0,0,0-9.3-19A79.87,79.87,0,0,1,48,104.45C47.76,61.09,82.72,25,126.07,24A80,80,0,0,1,208,104Z" opacity="0.2" /><path d="M176,232a8,8,0,0,1-8,8H88a8,8,0,0,1,0-16h80A8,8,0,0,1,176,232Zm40-128a87.55,87.55,0,0,1-33.64,69.21A16.24,16.24,0,0,0,176,186v6a16,16,0,0,1-16,16H96a16,16,0,0,1-16-16v-6a16,16,0,0,0-6.23-12.66A87.59,87.59,0,0,1,40,104.49C39.74,56.83,78.26,17.14,125.88,16A88,88,0,0,1,216,104Zm-16,0a72,72,0,0,0-73.74-72c-39,.92-70.47,33.39-70.26,72.39a71.65,71.65,0,0,0,27.64,56.3A32,32,0,0,1,96,186v6h64v-6a32.15,32.15,0,0,1,12.47-25.35A71.65,71.65,0,0,0,200,104Zm-16.11-9.34a57.6,57.6,0,0,0-46.56-46.55,8,8,0,0,0-2.66,15.78c16.57,2.79,30.63,16.85,33.44,33.45A8,8,0,0,0,176,104a9,9,0,0,0,1.35-.11A8,8,0,0,0,183.89,94.66Z" /></svg>
      </span>
      <div>
        {title && <div className="callout-title">
            {title}
          </div>}
        <div className="callout-body">
          {children}
        </div>
      </div>
    </div>
  </div>;

export const RememberCallout = ({title, children}) => <div className="callout-box callout-remember">
    <div className="callout-row">
      <span className="callout-icon">
        <svg width="22" height="22" xmlns="http://www.w3.org/2000/svg" viewBox="0 0 256 256" fill="currentColor"><path d="M229.66,98.34,172.39,155.8c11.46,22.93-1.72,45.86-10.11,57a8,8,0,0,1-12,.83L42.34,105.76A8,8,0,0,1,43,93.85c29.65-23.92,57.4-10,57.4-10l57.27-57.46a8,8,0,0,1,11.31,0L229.66,87A8,8,0,0,1,229.66,98.34Z" opacity="0.2" /><path d="M235.32,81.37,174.63,20.69a16,16,0,0,0-22.63,0L98.37,74.49c-10.66-3.34-35-7.37-60.4,13.14a16,16,0,0,0-1.29,23.78L85,159.71,42.34,202.34a8,8,0,0,0,11.32,11.32L96.29,171l48.29,48.29A16,16,0,0,0,155.9,224c.38,0,.75,0,1.13,0a15.93,15.93,0,0,0,11.64-6.33c19.64-26.1,17.75-47.32,13.19-60L235.33,104A16,16,0,0,0,235.32,81.37ZM224,92.69h0l-57.27,57.46a8,8,0,0,0-1.49,9.22c9.46,18.93-1.8,38.59-9.34,48.62L48,100.08c12.08-9.74,23.64-12.31,32.48-12.31A40.13,40.13,0,0,1,96.81,91a8,8,0,0,0,9.25-1.51L163.32,32,224,92.68Z" /></svg>
      </span>
      <div>
        {title && <div className="callout-title">
            {title}
          </div>}
        <div className="callout-body">
          {children}
        </div>
      </div>
    </div>
  </div>;

<VendorCreationWorkflowDiagramTopNav highlight="D" />

<div className="border-[1px] rounded-none p-4 bg-[#ffffff] border-[#FEB6FE] dark:bg-[#131414] dark:border-[#FEB6FE]">
  <ActivateVendorInPleoDiagram />
</div>

This how-to covers activating the Pleo Vendor once its corresponding record has been created in the Accounting System.

Run this after [How to Create a Vendor in the AS](/docs/current/how-tos/accounting-integrations/vendors/how-to-create-vendor-in-as), which covers creating the vendor record in the Accounting System.

## Prerequisites

Before you begin:

* You have completed [How to Create a Vendor in the AS](/docs/current/how-tos/accounting-integrations/vendors/how-to-create-vendor-in-as) and have the AS-assigned `externalId` (and `code`, if available)
* Your integration is authenticated using one of the [supported authentication methods](/docs/current/integration-design/auth/integration-design-auth-overview#authentication-policy-overview)
* Your integration can call Pleo's Vendors API endpoints

## Scenario

This how-to continues from the [How to Create a Vendor in the AS](/docs/current/how-tos/accounting-integrations/vendors/how-to-create-vendor-in-as) scenario: the "Greenfield Logistics" vendor was created in the AS with `externalId: AS-VENDOR-7841` and `code: 2041`.

## Steps

### 1. Activate the Vendor in Pleo

**API Endpoint**: POST [`/v1/vendors/{id}:activate`](/reference/external-vendors/activate-a-vendor)

**Example parameters**: id: `c27ed4d6-3d3d-458e-8f3f-735fdf32a3bc`

Report the identifiers assigned by the AS back to Pleo. This transitions the Vendor's `state` from `DRAFT` to `ACTIVE`.

**Example Pseudo:**

```pseudo theme={null}
activateRequest.externalId = asVendor.externalId
activateRequest.code       = asVendor.code
POST activateRequest to Pleo /v1/vendors/{draftVendor.id}:activate
```

#### Example Request

<Tabs>
  <Tab title="OAuth 2.0">
    ```bash theme={null}
    curl -X POST "https://external.staging.pleo.io/v1/vendors/c27ed4d6-3d3d-458e-8f3f-735fdf32a3bc:activate" \
      -H "Authorization: Bearer <access_token>" \
      -H "Content-Type: application/json;charset=UTF-8" \
      -d '{
            "externalId": "AS-VENDOR-7841",
            "code": "2041"
          }'
    ```
  </Tab>

  <Tab title="API Key">
    ```bash theme={null}
    curl --request POST \
      -u "pls_1ab2cd3e4f5g6h7a89b012c34de56f78_gabc90:" \
      -H "Accept: application/json;charset=UTF-8" \
      -H "Content-Type: application/json;charset=UTF-8" \
      "https://external.staging.pleo.io/v1/vendors/c27ed4d6-3d3d-458e-8f3f-735fdf32a3bc:activate" \
      -d '{
            "externalId": "AS-VENDOR-7841",
            "code": "2041"
          }' \
    | jq
    ```
  </Tab>
</Tabs>

#### Example Response

This endpoint returns `204 No Content` on success. Fetching the Vendor afterwards confirms the new state:

```json theme={null}
{
  "data": {
    "id": "c27ed4d6-3d3d-458e-8f3f-735fdf32a3bc",
    "companyId": "12abc3d4-e567-890e-1234-abc56e78fabc",
    "name": "Greenfield Logistics",
    "country": "GB",
    "registrationNumber": "",
    "taxRegistrationNumber": "GB987654321",
    "externalId": "AS-VENDOR-7841",
    "code": "2041",
    "state": "ACTIVE",
    "defaultCurrency": "GBP",
    "createdAt": "2026-07-08T10:05:43.530450712Z",
    "updatedAt": "2026-07-08T10:14:02.221310Z"
  }
}
```

<NoteCallout title="Note">
  `code` is optional on activation. If the AS has no separate account code beyond its own identifier, omit `code` or set it to the same value as `externalId`.
</NoteCallout>

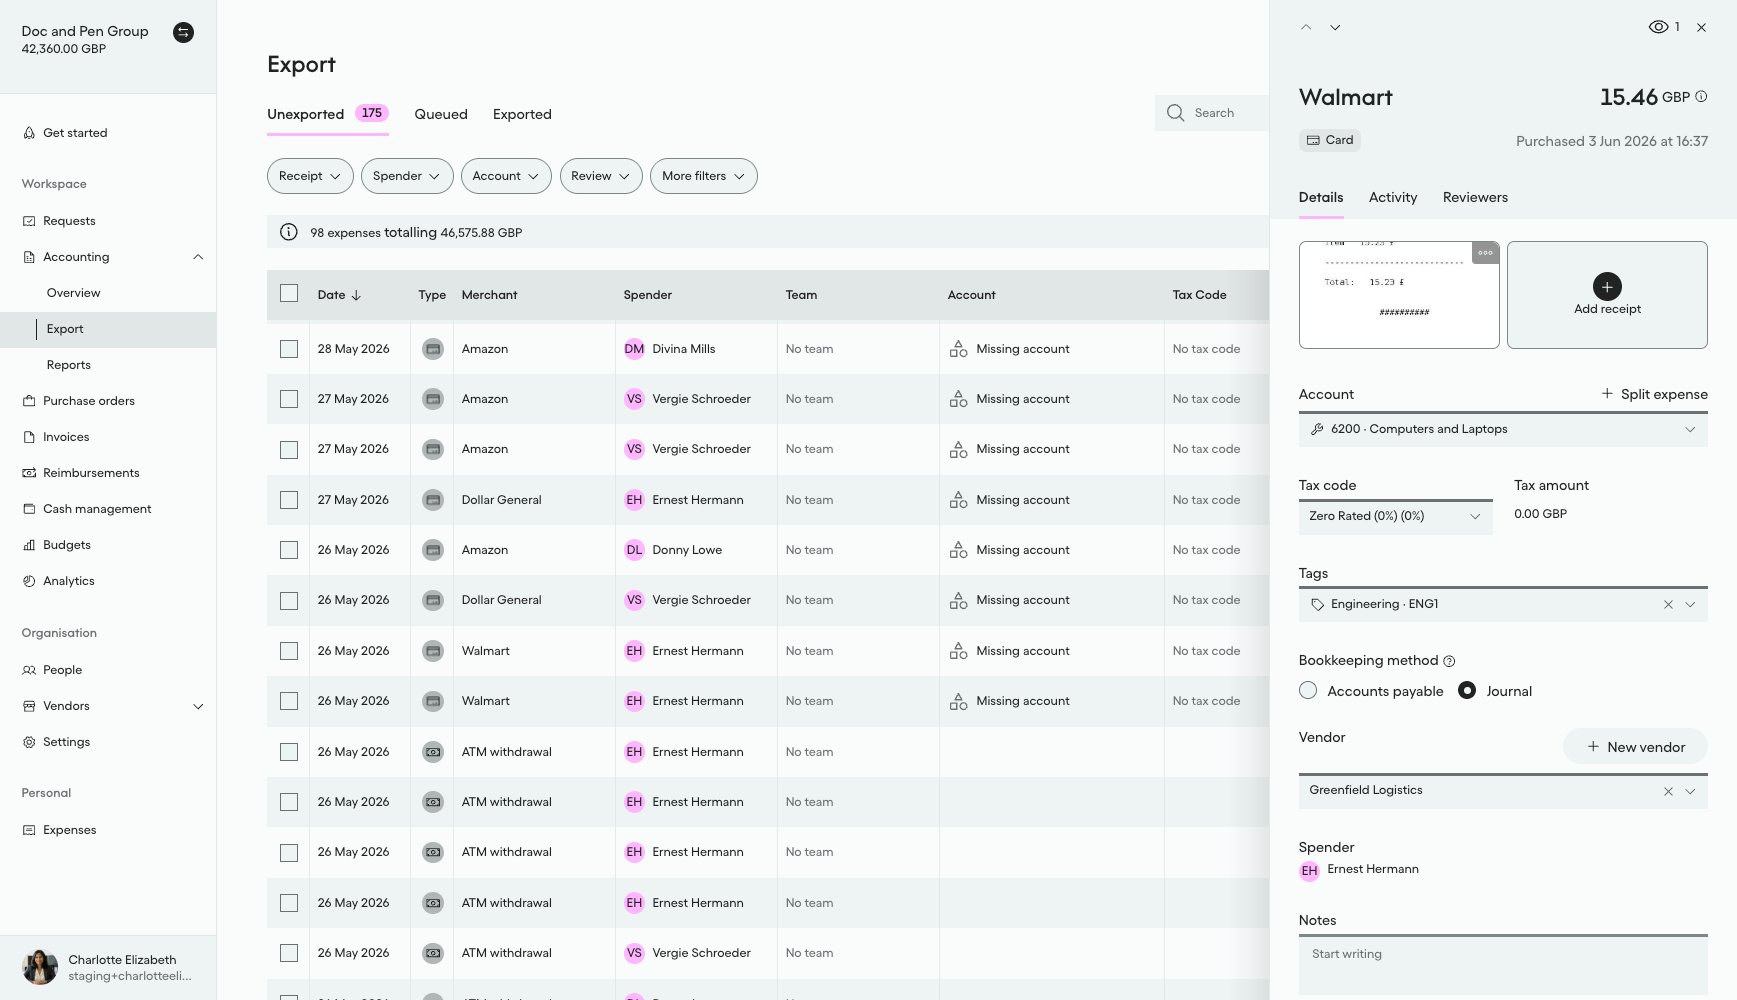
#### What it looks like in Pleo Web App

1. Select **Accounting** from the main left-hand navigation.
2. Select **Export** from the sub-menu.
3. Click on the same row to reopen the details panel for the expense used in [How to Create Vendors in Pleo](/docs/current/how-tos/accounting-integrations/vendors/how-to-create-vendors-in-pleo).

Once activation is complete, "Greenfield Logistics" appears on the Vendor field as a normal linked Vendor, with no draft notice:

<div style={{ textAlign: "center" }}>
  <img src="https://mintcdn.com/pleo-61d4d38b/OQXz7YYPcGlsTpec/images/current/accounting-integrations/imports/vendor-sync/ui-vendors-active-linked-greenfield-logistics.png?fit=max&auto=format&n=OQXz7YYPcGlsTpec&q=85&s=c904d65a782c20574dfdf1b65f613677" alt="Vendor field on an expense showing Greenfield Logistics after activation, with no draft notice" width="100%" style={{ display: "block", margin: "0 auto" }} data-path="images/current/accounting-integrations/imports/vendor-sync/ui-vendors-active-linked-greenfield-logistics.png" />
</div>

<br />

<WarningCallout title="Warning">
  If this activate call fails, times out, or its outcome is unknown, don't repeat [How to Create a Vendor in the AS](/docs/current/how-tos/accounting-integrations/vendors/how-to-create-vendor-in-as). That vendor record already exists in the AS from that step, so creating it again would produce a duplicate.

  <br />

  <br />

  Instead, persist the AS-assigned `externalId` and `code` as soon as that step succeeds. On retry, skip straight to this activate call using those stored identifiers.

  <br />

  <br />

  See [If Activation Fails](/docs/current/integration-design/exports/vendors/integration-design-vendor-creation-create-and-activate#if-activation-fails) for the full retry model.
</WarningCallout>

<RememberCallout title="Remember">
  If you release your per-company concurrency lock too early, a [Vendor Sync](/docs/current/how-tos/accounting-integrations/imports/vendors/how-to-create-vendors) run could pick up this Vendor mid-flight and archive or duplicate it.

  <br />

  <br />

  Only release it once this call succeeds, or once you abandon this Vendor under your own retry-abandonment policy.

  <br />

  <br />

  This is the same lock your integration took before [How to Create a Vendor in the AS](/docs/current/how-tos/accounting-integrations/vendors/how-to-create-vendor-in-as). This activate call is where you release it.
</RememberCallout>

***

## Result

The table below recaps the outcome for this Vendor.

| Vendor               | Pleo State Before | Action    | Final Pleo State |
| -------------------- | ----------------- | --------- | ---------------- |
| Greenfield Logistics | DRAFT             | Activated | ACTIVE           |

The Vendor is now activated and eligible to be matched by future [Vendor Sync](/docs/current/how-tos/accounting-integrations/imports/vendors/how-to-fetch-and-match-vendors) runs using its new `externalId`. It becomes available for bookkeepers to tag on expenses and invoices, provided Vendor Tagging is enabled for the company. See [How to Enable Vendor-Based Bookkeeping](/docs/current/how-tos/accounting-integrations/how-to-enable-vendor-based-bookkeeping).

***

## What Comes Next?

<WhatComesNext href="/docs/current/guides/vendor-creation-workflow-guide#what-comes-next">
  Vendor Creation Workflow Guide
</WhatComesNext>

***

<div className="text-xs uppercase" style={{ fontVariant: 'small-caps' }}>
  this how-to is part of:
</div>

<div className="mt-4 flex flex-wrap gap-2">
  <a
    href="/docs/current/guides/vendor-creation-workflow-guide"
    className="inline-flex items-center rounded-full border border-gray-300 dark:border-gray-600
px-3 py-1 text-xs font-medium
bg-white dark:bg-[#1f262b] text-black dark:text-white
hover:bg-gray-100 dark:hover:bg-[#2b2f33]
transition-colors"
  >
    Vendor Creation Workflow Guide
  </a>
</div>

***

## Related Reading

* [How to Create a Vendor in the AS](/docs/current/how-tos/accounting-integrations/vendors/how-to-create-vendor-in-as)
* [Create and Activate Vendors Integration Design](/docs/current/integration-design/exports/vendors/integration-design-vendor-creation-create-and-activate)
* [Platform Capabilities: Vendor Creation](/docs/current/platform/exports/vendors/vendor-creation-overview)

***