> ## Documentation Index
> Fetch the complete documentation index at: https://developers.pleo.io/llms.txt
> Use this file to discover all available pages before exploring further.

# How to Generate Standalone API Keys

export const WhatComesNext = ({children, href}) => <div className="mt-4">
    <a href={href} className="
        inline-flex items-center justify-center
        rounded-full
        bg-black text-white dark:bg-[#1f262b]
        px-5 py-2.5 text-sm font-medium
        no-underline border-0
        hover:bg-[#ffe6ea] dark:hover:bg-[#2b1f23]
        hover:text-black
        transition-colors
      ">
      {children} →
    </a>
  </div>;

export const NoteCallout = ({title, children, icon = "💡"}) => <div style={{
  backgroundColor: 'var(--recommended-bg)',
  borderLeft: '4px solid #3beaf6',
  borderRadius: '10px',
  padding: '18px 22px',
  marginBottom: '20px',
  boxShadow: '1px 1px 3px rgba(0,0,0,0.06)'
}}>
    <div style={{
  display: 'flex',
  alignItems: 'flex-start',
  gap: '14px'
}}>
      <span style={{
  fontSize: '22px',
  lineHeight: '1',
  flexShrink: 0
}}>
        {icon}
      </span>
      <div>
        {title && <div style={{
  fontSize: '16px',
  fontWeight: 600,
  color: 'var(--recommended-title)',
  marginBottom: '6px'
}}>
            {title}
          </div>}
        <div style={{
  fontSize: '14px',
  lineHeight: 1.65
}}>
          {children}
        </div>
      </div>
    </div>
  </div>;

export const RememberCallout = ({title, children, icon = "🪢"}) => <div style={{
  backgroundColor: 'var(--recommended-bg)',
  borderLeft: '4px solid #f63b92',
  borderRadius: '10px',
  padding: '18px 22px',
  marginBottom: '20px',
  boxShadow: '1px 1px 3px rgba(0,0,0,0.06)'
}}>
    <div style={{
  display: 'flex',
  alignItems: 'flex-start',
  gap: '14px'
}}>
      <span style={{
  fontSize: '22px',
  lineHeight: '1',
  flexShrink: 0
}}>
        {icon}
      </span>
      <div>
        {title && <div style={{
  fontSize: '16px',
  fontWeight: 600,
  color: 'var(--recommended-title)',
  marginBottom: '6px'
}}>
            {title}
          </div>}
        <div style={{
  fontSize: '14px',
  lineHeight: 1.65
}}>
          {children}
        </div>
      </div>
    </div>
  </div>;

export const ExplorativeCallout = ({title, children, icon = "🧪"}) => <div style={{
  backgroundColor: 'var(--recommended-bg)',
  borderLeft: '4px solid #b5f63b',
  borderRadius: '10px',
  padding: '18px 22px',
  marginBottom: '20px',
  boxShadow: '1px 1px 3px rgba(0,0,0,0.06)'
}}>
    <div style={{
  display: 'flex',
  alignItems: 'flex-start',
  gap: '14px'
}}>
      <span style={{
  fontSize: '22px',
  lineHeight: '1',
  flexShrink: 0
}}>
        {icon}
      </span>
      <div>
        {title && <div style={{
  fontSize: '16px',
  fontWeight: 600,
  color: 'var(--recommended-title)',
  marginBottom: '6px'
}}>
            {title}
          </div>}
        <div style={{
  fontSize: '14px',
  lineHeight: 1.65
}}>
          {children}
        </div>
      </div>
    </div>
  </div>;

<ExplorativeCallout title="Explorative Workflow">
  **Pleo Partners** must use **OAuth 2.0** as their production authentication method, [unless exempt](/docs/current/getting-started/developer-partnership-programme#authentication-requirements).
  Standalone API Keys are intended for safe exploration or internal tooling in Staging or Production.
</ExplorativeCallout>

Generating a Standalone API Key allows you to explore and test Pleo APIs securely in Staging or Production environments.

## Prerequisites

* You have access to [**Staging** or **Production**](/docs/current/how-tos/environment-access/how-to-get-access-to-all-env-standalone-api-keys) environments
* You understand that Standalone API Keys are [**restricted and not available to all customers or partners**](/docs/current/authentication/standalone-api-keys-overview)
* You understand the [permission and scope](/docs/current/authentication/standalone-api-keys-overview#how-standalone-api-keys-work-conceptually) requirements for creating Standalone API Keys
* You understand [OAuth 2.0](/docs/current/authentication/oauth/oauth-overview) is the recommended method for multi-customer integrations

## Steps

### 1. Create an API Key

1. Log into your **Pleo Web App** for [Staging](https://app.staging.pleo.io/access) or [Production](https://app.pleo.io/access)
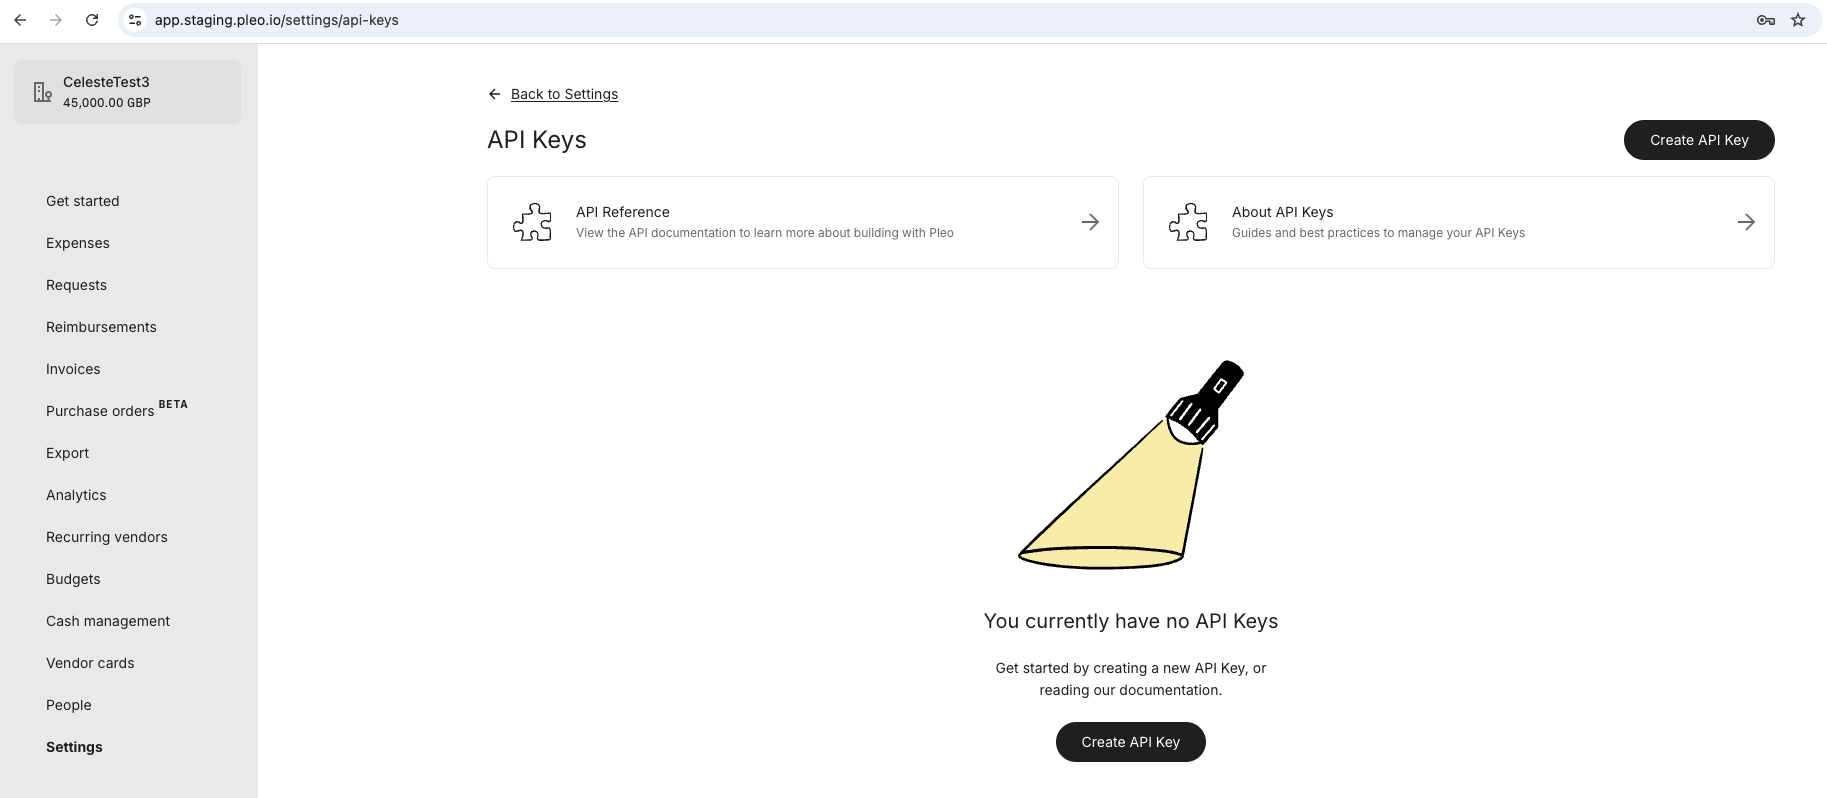
2. Click **Settings** from the main left-hand menu
3. Scroll down and click **API Keys**
4. Click **Create API Key**

<div style={{ textAlign: "center" }}>
  <img src="https://mintcdn.com/pleo-61d4d38b/_rkxCoO48Dr_L3ku/images/current/standalone-api-keys/standalone-api-keys-new.png?fit=max&auto=format&n=_rkxCoO48Dr_L3ku&q=85&s=03e376c4cc6bb6ba38a7aa84d0ed7b48" alt="Standalone API Keys - New" width="100%" style={{ display: "block", margin: "0 auto" }} data-path="images/current/standalone-api-keys/standalone-api-keys-new.png" />
</div>

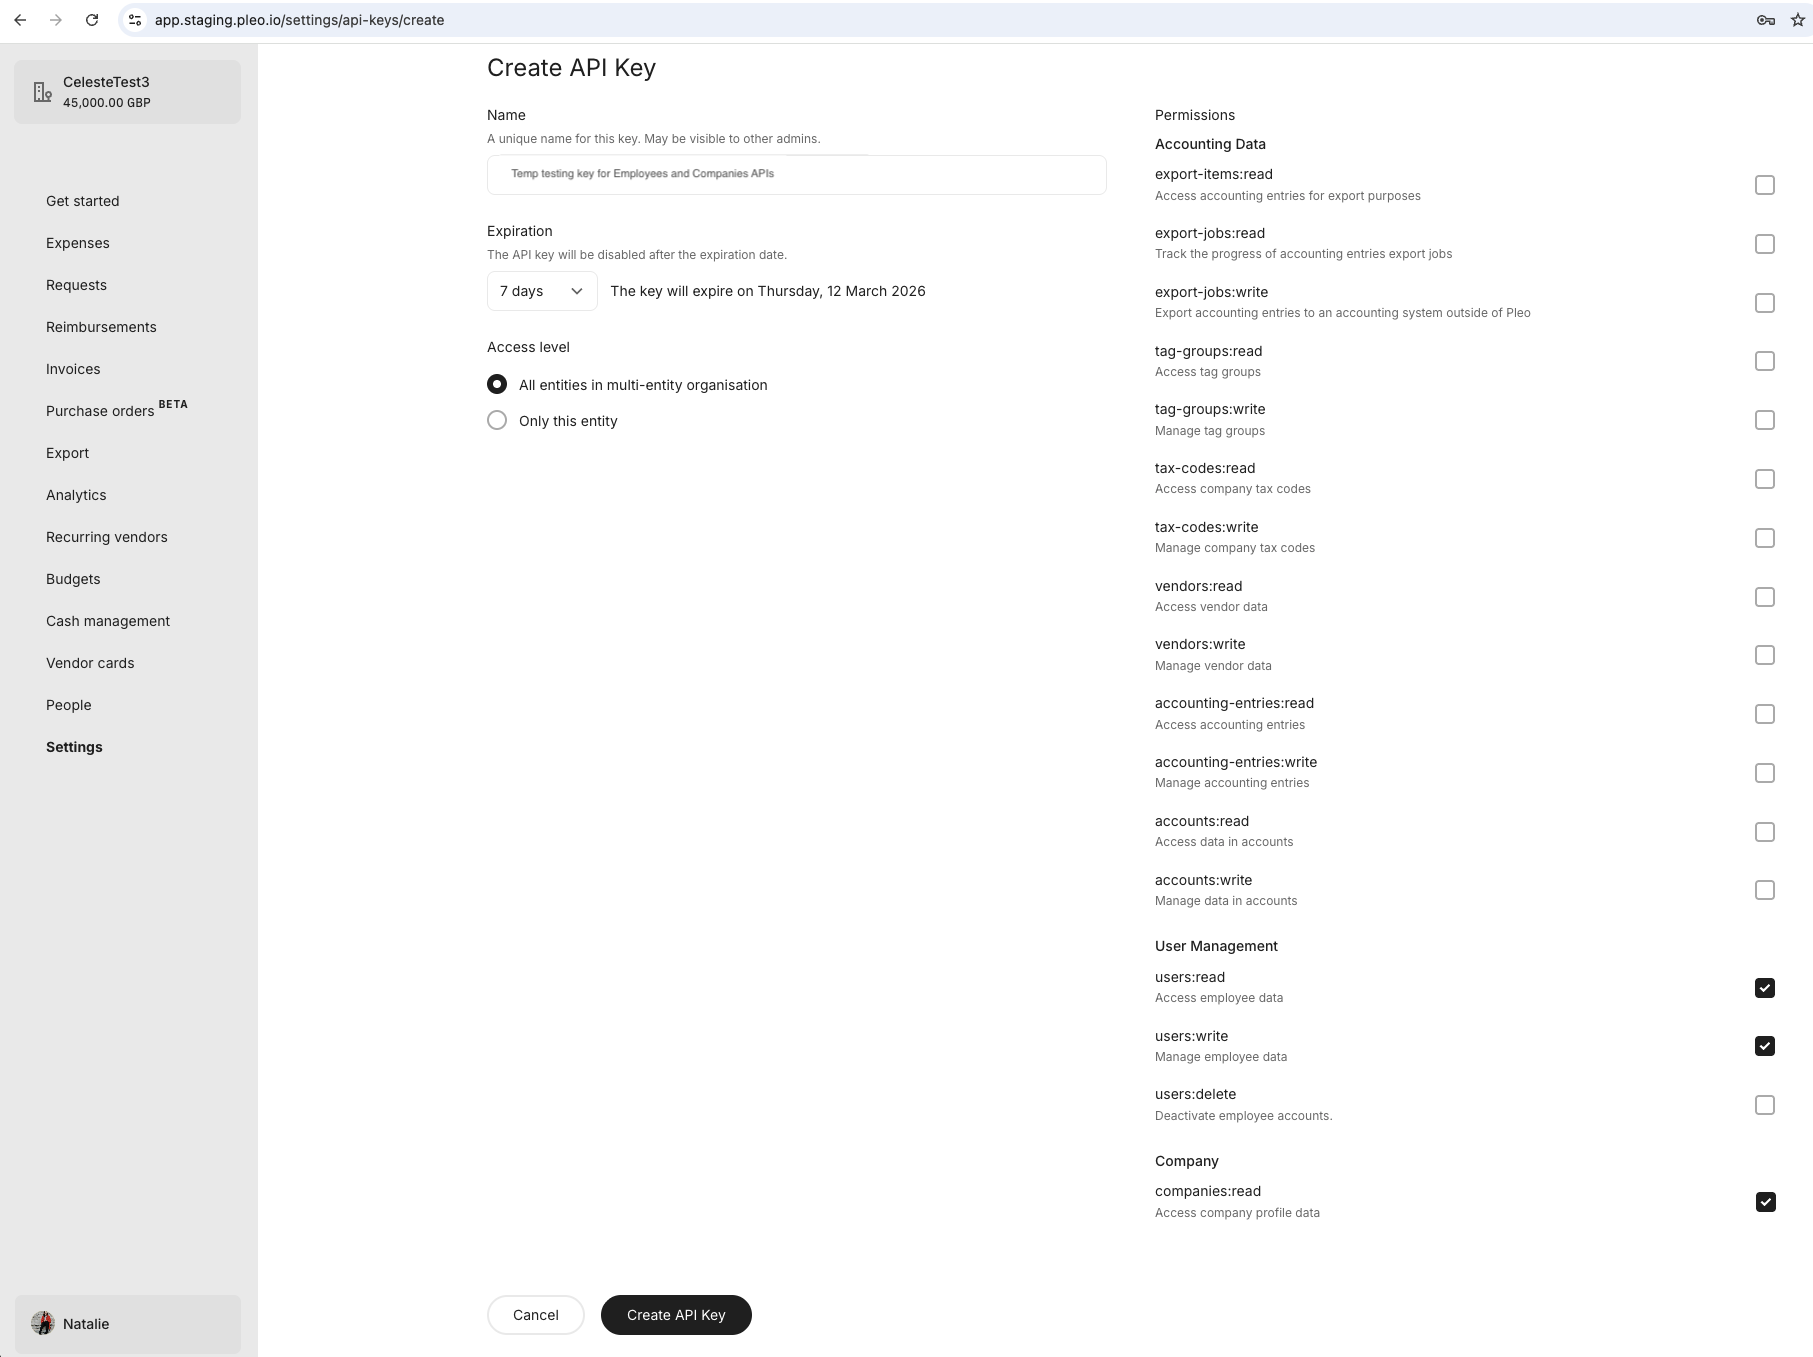
5. Enter a descriptive **Name**
6. Select an appropriate **Expiration**
7. Select the entity **Access level** the key should access
8. Tick the **Permissions** [(API Scopes)](/docs/current/authentication/api-scopes) that should apply to the key
9. Click **Create API Key**

<div style={{ textAlign: "center" }}>
  <img src="https://mintcdn.com/pleo-61d4d38b/_rkxCoO48Dr_L3ku/images/current/standalone-api-keys/standalone-api-keys-create.png?fit=max&auto=format&n=_rkxCoO48Dr_L3ku&q=85&s=9cf5cb6e17a938c04e235b1d000d13f5" alt="Standalone API Keys - Create" width="100%" style={{ display: "block", margin: "0 auto" }} data-path="images/current/standalone-api-keys/standalone-api-keys-create.png" />
</div>

<br />

<RememberCallout title="Remember">
  * Follow the [Integration Design](/docs/current/integration-design/auth/api-keys/integration-design-security-for-standalone-api-keys) guidance for managing and safeguarding your API Keys.
  * Integrations are always **1-to-1 connections**. Even if you only use one API Key in a [multi-entity setup](/docs/current/integration-design/auth/multi-entity/integration-design-auth-multi-entity-overview), each API call must include the correct `company_id`.
  * When an API Key expires, it becomes [**disabled for all integrations**](/docs/current/integration-design/auth/api-keys/integration-design-user-exp-guidelines-for-standalone-api-keys#expiry-and-failure-recovery) using that key.
</RememberCallout>

### 2. Securely Store Your API Key

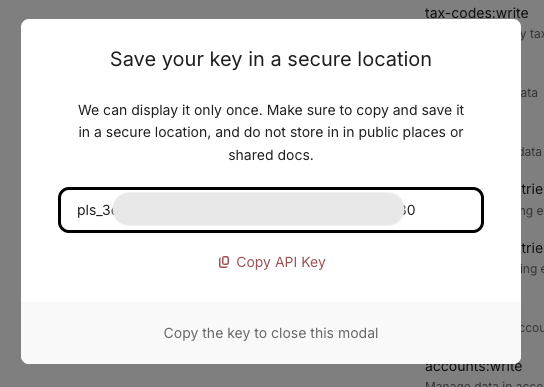
1. Copy the API Key to your clipboard
2. [Store the API Key securely](/docs/current/integration-design/auth/api-keys/integration-design-security-for-standalone-api-keys)

<NoteCallout title="Important">
  * Once you close the modal, you **cannot view the API Key again**.
  * There is **no regenerate option**. If the key is lost, you must create a new one.
</NoteCallout>

<div style={{ textAlign: "center" }}>
  <img src="https://mintcdn.com/pleo-61d4d38b/_rkxCoO48Dr_L3ku/images/current/standalone-api-keys/standalone-api-keys-clipboard.png?fit=max&auto=format&n=_rkxCoO48Dr_L3ku&q=85&s=a2656c10a467927bed77fad5ff904bf7" alt="Standalone API Keys - Save" width="70%" style={{ display: "block", margin: "0 auto" }} data-path="images/current/standalone-api-keys/standalone-api-keys-clipboard.png" />
</div>

## Result

* You have generated an **API Key** with the correct configuration and API scope
* You have securely stored your API Key

***

## What Comes Next?

<WhatComesNext href="/docs/current/how-tos/api-keys/how-to-make-an-api-call-using-standalone-api-keys">
  Make your first API call using your API Key
</WhatComesNext>

***

<div className="text-xs uppercase" style={{ fontVariant: 'small-caps' }}>
  this how-to is part of:
</div>

<div className="mt-4 flex flex-wrap gap-2">
  <a
    href="/docs/current/guides/standalone-api-keys-workflow-guide"
    className="inline-flex items-center rounded-full border border-gray-300 dark:border-gray-600 
px-3 py-1 text-xs font-medium 
bg-white dark:bg-[#1f262b] text-black dark:text-white
hover:bg-gray-100 dark:hover:bg-[#2b2f33]
transition-colors"
  >
    Standalone API Key Workflow Guide
  </a>
</div>

***

## Related Reading

* [OAuth 2.0 Setup Workflow Guide](/docs/current/guides/oauth-workflow-guide): Step-by-step instructions on how to configure OAuth 2.0 for multi-customer integrations.

***
