Quickstart

Welcome to the Pleo API! We're here to help you get connected fast. This Quickstart guide walks you through using an API key to get up and running.


Introduction

There are two ways to authenticate:

For this guide, we will be using the API keys flow and assume you have a Pleo account. Read more details about each flow in our Authentication guide.


1. Get your API key

  1. Head to your Pleo account > Settings > Scroll down and click on API keys

  1. Click on Create API key


  1. Add the following details
  • Name: give your key a name that will help you remember what it's for, like Pleo API Quickstart
  • Expiration date: choose when you want the key to expire
  • Access level: decide if the key is for a specific entity (company) or for multiple entities of a business (organisation). Read about the differences here.
  • Permissions: select the scopes you need. Your selections will automatically enable the right permissions in your key.
  1. Click on Create API Key
  1. Store your key securely as you will only be able to see it once

2. Make your first API call

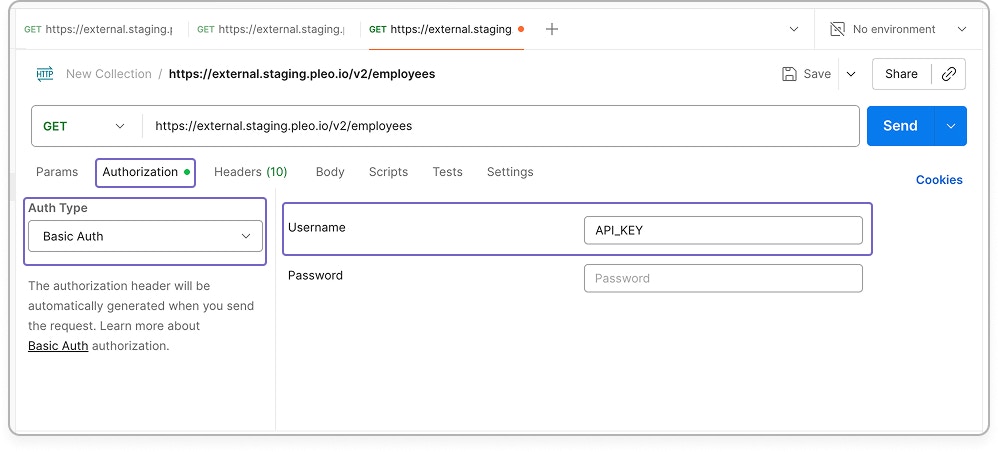
Time to put your new key to use!

When authenticating with API keys, include the key in the Authorization header of the request, using the Basic schema. The key should be used as the username, and an empty string should be used as the password.

We'll use the Get Search for employees query for this example.

curl

With curl, specify the -u / --user flag, followed by the API key. The password is an empty string.

curl --request GET \
     --url https://external.pleo.io/v2/employees \
     --header 'accept: application/json;charset=UTF-8' \
     --header 'authorization: Basic API_KEY'

If the request is successful, you will receive a response such as:

{
  "data": [
    {
      "code": "string",
      "companyId": "3fa85f64-5717-4562-b3fc-2c963f66afa6",
      "email": "string",
      "firstName": "string",
      "id": "3fa85f64-5717-4562-b3fc-2c963f66afa6",
      "jobTitle": "string",
      "lastName": "string",
      "phone": "string"
    }
  ],
  "pagination": {
    "currentRequestPagination": {
      "after": "string",
      "before": "string",
      "limit": 0,
      "offset": 0,
      "parameters": {
        "additionalProp": [
          "string"
        ]
      },
      "sortingKeys": [
        "string"
      ],
      "sortingOrder": [
        "ASC"
      ]
    },
    "endCursor": "string",
    "hasNextPage": true,
    "hasPreviousPage": true,
    "startCursor": "string",
    "total": 0
  }
}

Postman

In Postman, you can specify the API key in the Authorization tab, selecting the Basic Auth type, and using the API key as the username, and an empty string as the password.


Errors

We use standard HTTP status codes to let you know if a request was successful or if there was an issue. For a full list of codes and what they mean, check out our API Response Codes | Errors guide.


Next steps

Congrats, you've just completed the Quickstart πŸŽ‰ We recommend checking the Auhtorization guide next.


What’s Next