

v1.export-job.created event is triggered. If you have subscribed to this event, webhook notifications are automatically sent to the endpoints you have configured. Hence, you do not need to poll GET https://external.pleo.io/v2/export-jobs.
How Webhooks Function?
The following diagram explains the workflow among a customer, third-party integration (third-party application + target endpoint), and Pleo (Pleo APIs + Webhook):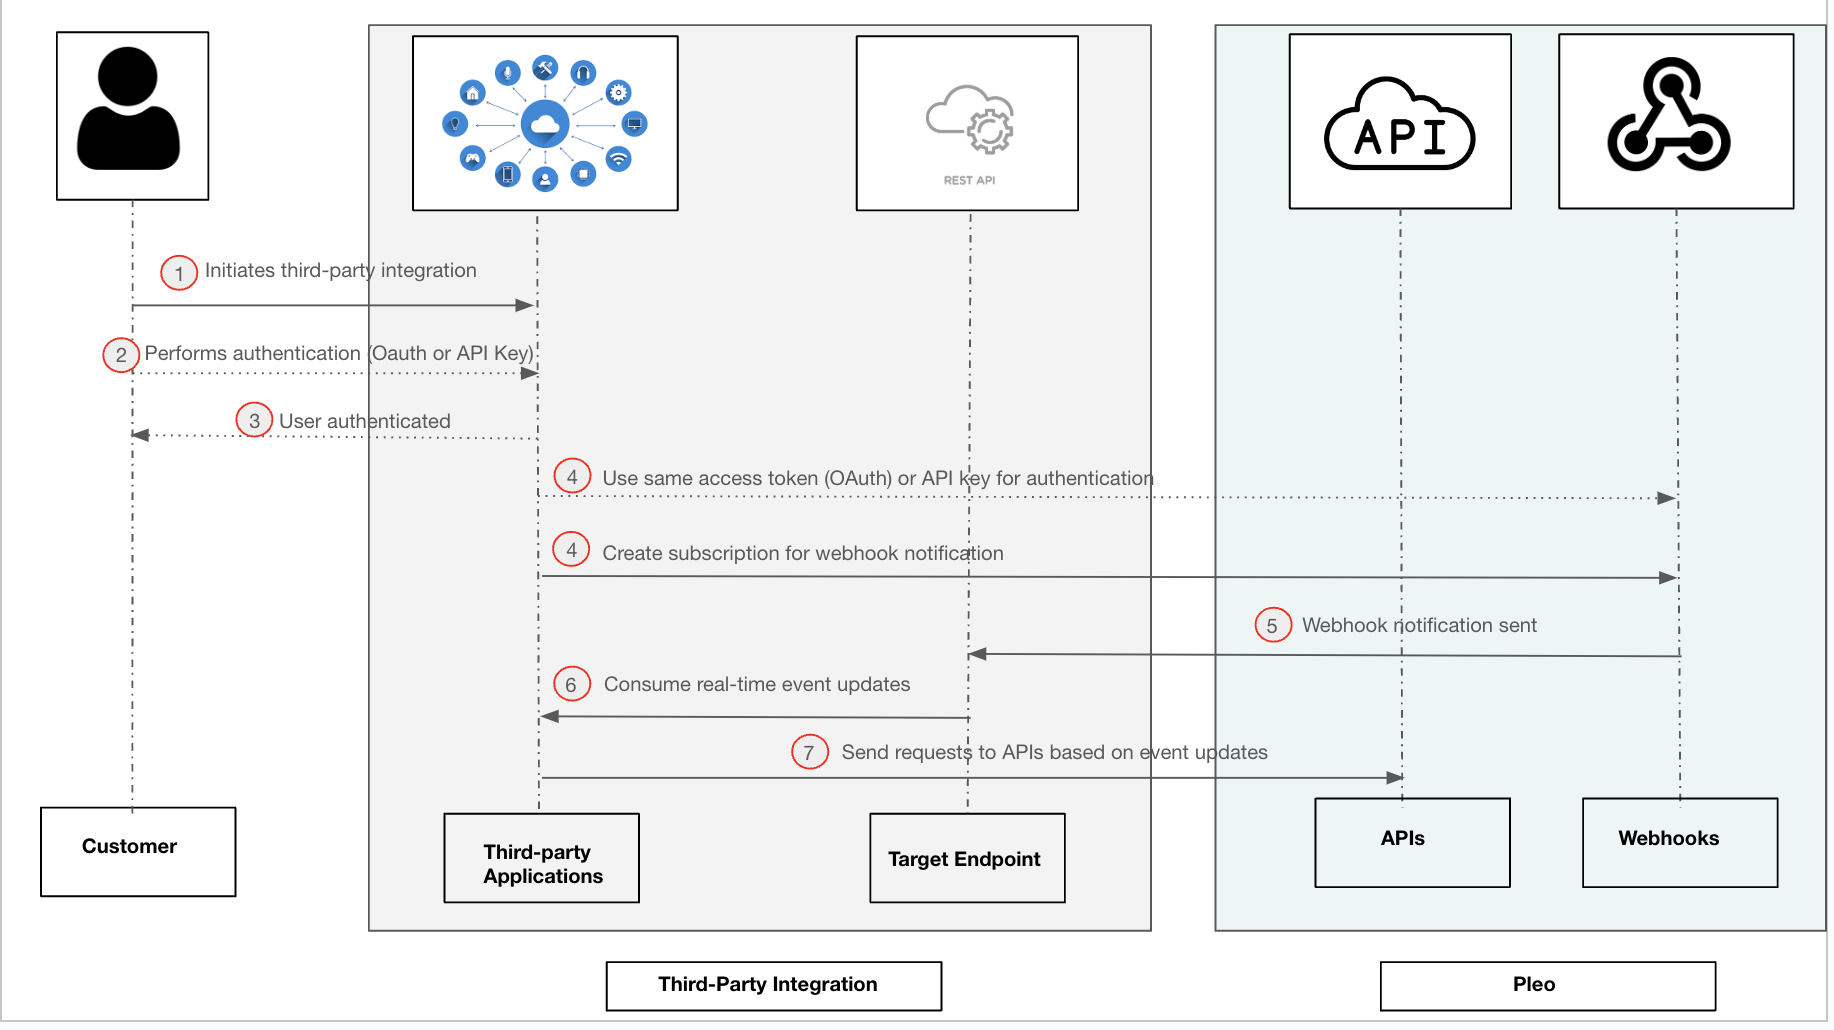
Key Features of Pleo Webhooks
- Event subscription: If you are a Developer Partner, you can subscribe to specific events in Pleo for which you want to be notified. For example, you can subscribe to the
v1.export.job-createdevent, which is triggered when the customer’s accounting data is exported to an external application. - Real-time notifications: When an event is triggered, it generates a webhook notification in real-time.
- Secure communication: All webhook notifications are sent over HTTPS to ensure secured data transmission.
- Webhook verification: The webhook signature and the timestamp mentioned in the request header are checked to verify the authenticity.
How to Set Up Webhook Notifications?
Perform the following to configure webhook notifications:- Ensure access: To subscribe to specific webhook events, you need access to the relevant API. In addition, you would also require the corresponding scopes essential to access the API. The scopes are already configured in the JWT token or the API key provided during the initial integration set up. For example, if you want to subscribe to export events, you need the
export-jobs:readandexport-jobs writescopes.
- Configure endpoints: You must configure the endpoint URL(s) to which you want to send the webhook notifications. For more information, see Configuring Receiving Endpoints.
- Subscribe events: Select the specific events for which you want to send webhook notifications. You can create a new subscription request through the
POST https://external.pleo.io/v1/subscriptionsendpoint. For more information, see Create a subscription. - Secure endpoints: We recommend that you set up verification for the incoming Pleo webhook notifications. This ensures protection from potential security threats. For more information, see Verifying Webhooks .
Configuring Receiving Endpoints
Configure the endpoints to which you want to send webhook notifications. These endpoints must conform with the following:- Hypertext Transfer Protocol Secure (HTTPS) method
- Available in the public domain
- Accepts POST request with JSON payload
Verifying Webhooks
To ensure the authenticity of the webhook notifications generated from Pleo, we recommend you to verify the webhook signature and timestamp specified in the request header.Source IP Addresses
If your receiving endpoint is protected by a firewall, ensure that the IP addresses listed here are whitelisted.Configuring Webhooks During Integration
For providing an optimised experience to customers, we recommend that you configure webhook subscriptions during the integration set up. Send a request to thePOST/v1 webhooks endpoint.
Webhook Notifications
Once you have created the subscriptions, webhook notifications are automatically sent to the target endpoints. The request message sent to the receiving endpoints contains a HTTPS header and a JSON payload.Sample Webhook Notification
Request Header
Request Payload
The request payload contains the following parameters:Successful Webhook Notification Delivery
If the configured endpoint has received the webhook notification, send a2xx response indicating successful delivery. Any other response code, including 3xx imply failures in sending webhook notifications.
Webhook Notification Delivery Retries
If the first attempt of delivering webhook notification to the configured endpoint fails, succeeding reattempts are made, based on the following schedule, with exponential backoff:- Immediately
- 5 seconds
- 5 minutes
- 30 minutes
- 2 hours
- 5 hours
- 10 hours
- 10 hours (in addition to the preceding attempt)